

워드프레스에서는 테마 파일을 수정하여 특정 카테고리 페이지 또는 태그 페이지의 레이아웃을 다르게 꾸밀 수 있습니다. 최근에는 워드프레스 알림판 내에서 특정 카테고리/태그 템플릿을 만들 수 있도록 발전하고 있습니다. 엘리멘터 프로나 아바다 또는 Divi와 같은 전체 사이트 편집(Full Site Editing) 기능을 제공하는 페이지 빌더나 테마를 이용하면 수월하게 관리자 페이지 내에서 사이트의 모든 섹션을 커스텀할 수 있습니다.
이 블로그에 사용된 GeneratePress 테마의 유료 버전에서도 Elements를 통해 비슷한 기능을 제공합니다. 루프 템플릿을 생성하여 특정 카테고리 페이지나 태그 페이지에 다른 레이아웃을 만들 수 있습니다.GeneratePress 테마: 카테고리/태그 템플릿 레이아웃 커스터마이징 방법
GeneratePress 테마의 사용자 정의하기에서 아카이브 페이지에 대하여 설정하는 레이아웃이 모든 아카이브 페이지(블로그 페이지, 모든 카테고리 페이지와 태그 페이지 등)에 적용됩니다. 특정 카테고리 페이지나 태그 페이지에 다른 스타일을 적용하고 싶은 경우 루프 템플릿을 생성하여 꾸밀 수 있지만, 이 글에서는 테마 파일을 수정하여 카테고리/태그 페이지 레이아웃을 커스터머마이징하는 방법에 대하여 살펴보겠습니다.워드프레스 카테고리 템플릿과 태그 템플릿
GP 테마에서 카테고리 템플릿과 태그 템플릿의 레이아웃은 외모 » 사용자 정의하기 » Layout » Blog 섹션에서 지정한 설정으로 표시됩니다. 여기에서 설정한 레이아웃이 블로그 페이지와 카테고리 페이지, 태그 페이지 등 모든 아카이브 페이지에 적용됩니다.- category-slug.php
- category-ID.php
- category.php
- archive.php
- index.php

- tag-slug.php
- tag-id.php
- tag.php
- archive.php
- index.php
카테고리/태그 템플릿 레이아웃 커스터마이징 방법
이 블로그에서는 낙서장 카테고리를 제외한 모든 카테고리 페이지는 최근 글(블로그) 페이지의 레이아웃과 동일합니다. 또한, 태그 페이지의 레이아웃도 다르게 구성했습니다. 모든 카테고리의 레이아웃을 다르게 꾸미고 싶다면 다음과 같은 방법으로 진행할 수 있습니다.- 차일드 테마를 만들고 활성화합니다.
- 부모 테마 폴더 내의 archive.php 파일을 복사(이동이 아님)하여 차일드 테마 폴더로 업로드합니다.
- archive.php 파일의 이름을 category.php로 변경하고 원하는 대로 수정합니다.
태그 템플릿 예시
이 블로그에서는 태그 페이지는 다음 그림과 같이 리스트로 표시되도록 바꾸었습니다.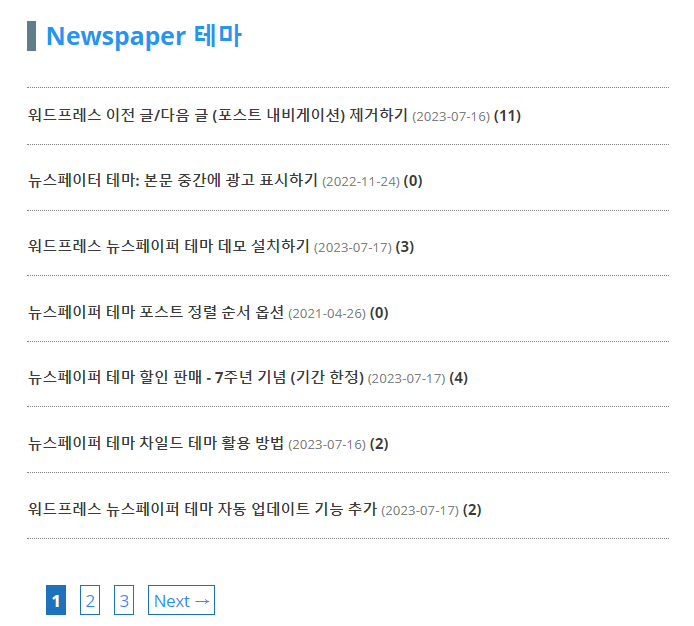
<?php/** * The template for displaying Archive pages of the GeneratePress theme. * * @package GeneratePress */// If this file is called directly, abort.if ( ! defined( 'ABSPATH' ) ) { exit; // Exit if accessed directly.}// Include the header file from your theme's directoryget_header(); ?> <!-- Begin the main content area --> <div <?php generate_do_attr( 'content' ); ?>> <!-- Main tag for the content --> <main <?php generate_do_attr( 'main' ); ?>> <?php // This action hook is used to add custom functions before the main content do_action( 'generate_before_main_content' ); // Checks if there are any posts that match the query if ( generate_has_default_loop() ) { if ( have_posts() ) : // Do actions specific to the archive title do_action( 'generate_archive_title' ); // Do actions before the loop do_action( 'generate_before_loop', 'archive' ); // The WordPress Loop: loads post content while ( have_posts() ) : the_post(); ?> <!-- Each post is displayed within an article tag --> <article id="post-<?php the_ID(); ?>" <?php post_class(); ?> <?php generate_do_attr( 'article' ); ?>> <div class="inside-article"> <header class="entry-header"> <!-- Display the post title and a link to the post --> <h2 class="entry-title"> <a href="<?php%20the_permalink();%20?>" title="<?php the_title_attribute(); ?>"><?php the_title(); ?></a> <!-- Display the date when the post was last modified --> <span>(<?php echo get_the_modified_date('Y-m-d'); ?>)</span> <!-- Display the number of comments on the post --> (<?php comments_number( '0', '1', '%' ); ?>) </h2> </header> </div> </article> <?php endwhile; // Do actions after the loop do_action( 'generate_after_loop', 'archive' ); else : // If no content, include the 'No posts found' template generate_do_template_part( 'none' ); endif; } // This action hook is used to add custom functions after the main content do_action( 'generate_after_main_content' ); ?> </main> </div> <?php // This action hook is used to add custom functions after the primary content area do_action( 'generate_after_primary_content_area' ); // Constructs the sidebars if they are enabled in the theme options generate_construct_sidebars(); // Include the footer file from your theme's directory get_footer();?>/* 태그 아카이브 */body.tag h2.entry-title { font-size: 0.9em; padding-bottom: 20px; border-bottom: 1px dotted gray;}body.tag h2.entry-title a { color: #3c3c3c;}body.tag h2.entry-title a:hover { color: #2196F3;}body.tag article { margin-bottom: 0px;}body.tag #main > header.page-header + article .entry-title { border-top: 1px dotted gray; padding-top: 20px;}body.tag header.page-header { display: block !important; padding-left: 20px !important;}body.tag header.page-header h1 { font-size: 1.5em; color: #2196F3; border-left: 10px solid #607D8B; padding-left: 10px; margin-bottom: -20px !important;}/* article date */body.tag article .entry-title span { color: gray; font-weight: normal; font-size: 0.9em;}


[…] GeneratePress 테마: 카테고리/태그 템플릿 레이아웃 커스터마이징 방법 […]